How We Built a Backyard Snowboard Setup for Summer, For Under $100
Summer is in the horizon, and we have been hit with a global pandemic. Countries around the world have been on lock down and borders closed unless its essential travel, we are not advised to not be in large groups and to social distance.
Those decisions have had a profound impact on people of various ages, and as a mom of teen boys, I most definitely saw the impact here in my home.
Because of where I grew up and because of my dad, I was able to develop the resourcefulness types of skills. I love being creative, and when given the opportunity to try a project that is creative,
I am for sure going to say yes. 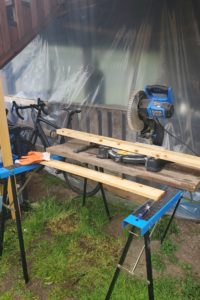
My son loves to snowboard. We are very fortunate to live in a place very close to a ski hill and a few years ago my son took a couple lessons and was hooked. Over the years he kept going up and kept getting better, and now he really wants to practice his tricks and learn more.
Unfortunately, our mountain shuts down early because of the marmots that live there. Also, the wonderful Covid-19 hit us, and the mountain had to shut down even earlier this year.
So, I was sent a YouTube video.
I asked him if he wanted to set the same thing up in our yard.
He was like, uhm, ya…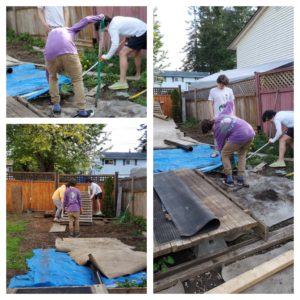
I watched other videos and read tutorials and then had an idea. I had a bunch of pallets and old decking 2 x 6’s, fence posts and so thought OK I think we could do this and made a list.
My List
Boards – I had so were free
use whatever you can find from scrap yards or people giving away
2 x 4’s – had 6 and they were under $4
Plywood – one sheet $20
Screws and tools – had
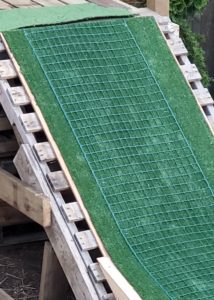
Turf – $40
Plastic fencing – $14
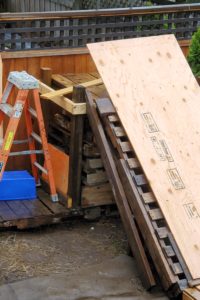
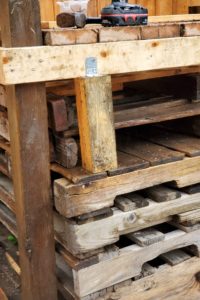
Pallets – free
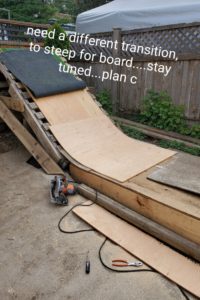
The first go around was somewhat jimmied as I had varied sized pallets on top of each other and then laid another pallet for the ramp. However, when my son tried it, the slope was not very steep, and speed was an issue. Also, the transition angle from the ramp to the flatter part of the slope was to deep.

I asked him and explained the process of what they must do to try a trick and so back to the drawing board. More reading and more videos, when finally, I found one that had a way better tutorial.
Although I did not use his exact plan, I was able to modify it so that the equipment we had here at home were able to get us 80% complete.
I cut the fenceposts and used the leftover 2 x 4’s I had and built the box. I took everything apart and stacked the pallets properly and to the height we wanted. I then built the box to fit the new square of pallets I had used for the tower and secured it with large 3-inch screws and support braces.

I then laid the other pallet down for the ramp and stood above to check angle. Once leveled the only things left to get were plywood and turf. Heading to Home Depot I bought 1/2-inch sheet of plywood and the guys there cut it for me lengthwise, which gave us a platform.

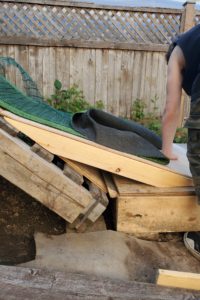
There were no more rolls of turf, so I bought an outdoor carpet which we cut into 3 parts equally giving us the turf to apply. I had seen a photo where someone had added thin plastic fencing over the turf carpet and this apparently makes it faster, so we added that as well. Now in the video he also talked about the transition from the ramp.
We first tried a 3/8 sheet of plywood cut with the grain and I bent it down into the angle. We screwed it to the platform and my son then sanded the edge’s, so it was not to sharp.

In the video though, the transition angle was different and when my son tested the ramp, he mentioned that the current transition slowed him down. As he went down, we noticed that the transition angle still was too deep. I tried to think about how this was going to work.
What did I have left over? How the heck does a non carpenter who sucks at math, figure this out? How the heck does one cut angle without a table saw? I mean I had a jigsaw; however, I was outside and set up, so used the skill saw instead.
Wow, it worked better than I thought it would and we had our transition.


OK now the feature. The rail and box. My son had mentioned a couple options, so I make one out of 6” PVC pipe which I mounted to a frame, the other, was a make shift box using a leftover 6” square post I had and mounting it onto a frame as well.


My son had a friend over and tried again. It worked. Pretty neat.

Now moving forward, even though this current set-up works, there are some fine tunings that would make it even safer and better. It was explained to me that with skies, going down a ramp the turning and flexibility is much easier. Now we had the nicer transition which did make it work for the snowboard, however, turning on the plastic proved challenging and to get the right push and carve to do a trick, we need a new plan for the turf.
Currently, this set up requires you to go straight and it is difficult to maneuver without slipping and falling hard on your back or arms.
There is a synthetic fake snow called M-snow and it looks like it allows the snowboarder to carve and slip on the ramp easier with more control.

I have not tried it yet as it is very expensive to ship here, it is though, the next step to making this backyard set-up more useful year-round.
All in all, it was a fun project. I loved the creative mind of my son who gave me the idea and my creative mind that implemented the idea. Never give up.
Leave a comment below if you like the idea. I have videos of the test; you can check it out on Instagram or Facebook.
Subscribe to my blog and you will not miss any growth mindset relatable stories or creative projects on the go. See you there.
Stay real, stay positive and never give up.